Completing user mapping
After you set the parameters for storage configuration, you should complete user mapping.
Your avatar > Add-ons, then Storage management tab
After mapping configurations are set successfully, the log-in will forward to the SSO (single sign-on) authentication process. The authentication window opens, and when you enter the right credentials, finally forwards to the Jive instance.
Mapping by Claims ID
To add the claims ID as part of the mapping fields:
-
In the Jive user interface, select Your avatar > Add-ons.
-
On the Storage Management tab, click Edit Instance next to the integration to want to configure.
-
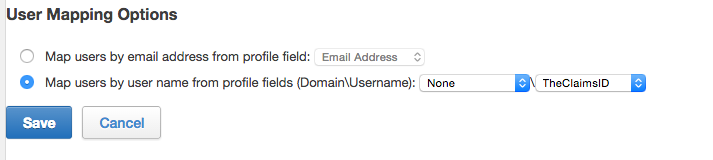
Under User Mapping Options, select Map users by user name from profile field, and then select None > TheClaimsID, as shown in the screenshot below.
Mapping by email
To map users by email:
- In the Jive user interface, select Your avatar > Add-ons.
- On the Storage Management tab, click Edit Instance next to the integration to want to configure.
- Under User Mapping Options, select Map Users by email address from profile field, and then select Email Address.
Mapping by Domain/Username
To map users by Domain/Username:
-
In the Jive user interface, select Your avatar > Add-ons.
-
On the Storage Management tab, click Edit Instance next to the integration to want to configure.
-
Under User Mapping Options, select Map Users by username from profile fields, and then select ENG Domain Name > ENG Username.
-
In AD FS management, add those rules:
Jive ENG UsernameandJive ENG Domain Name.Jive ENG Username : ``` c:[Type == "http://schemas.xmlsoap.org/ws/2005/05/identity/claims/upn"] => issue(Type = "ADFSNTLMUN", Value = RegExReplace(c.Value, "@[^\n]*", ""), ValueType = c.ValueType);
    Jive Domain Name
    :   ```
c:[Type == "http://schemas.microsoft.com/ws/2008/06/identity/claims/windowsaccountname"]
=> issue(Type = "ADFSNTLMDOMAIN", Value = "ENG", ValueType = c.ValueType);
- In the Jive Admin Console, go to People > Profile Settings, and click Create new fields.
- Create new fields with the Text type selected:
ENG Username,ENG Domain Name, andENG Domain Name. - Change the SAML settings in Jive as follows:
- Go to People > Settings > Single Sign-On > SAML > User Attribute Mapping.
- Set
ADFSNTLMUNin ENG Username andADFSNTLMDOMAIN" in ENG Domain Name. Mark them both as Federated. - "Click Save All SAML Settings