Installation of Social Group Sync Add-on
The Social Group Sync Add-on requires the Jive instance configuration and then the add-on installation and configuration. The add-on also uses user groups to limit access.
Admin Console > Permissions > User Groups
Advanced Admin Console > People > Management > Create User Group
User interface: Your avatar > Add-ons
A user must have at least Manage System permissions to install add-ons.
This add-on requires connectivity to Jive Cloud Shared Services.
- Prerequisites for installing Social Group Sync Add-on Jive must be configured before the Social Group Sync Add-on is installed. These configurations are performed by Support.
Open a support ticket with the Support team to install this add-on. The Social Group Sync Add-on is installed from the Add-ons page.
Make sure that the Jive instance is configured, as described in the prerequisites mentioned above, before proceeding with the add-on installation.
Installing from a package
To install the Social Group Sync Add-on from a zipped package and sign it:
-
Download the latest version of the Social Group Sync Add-on.
-
In the user interface, click on your avatar in the upper-right corner, and then select Add-ons.
-
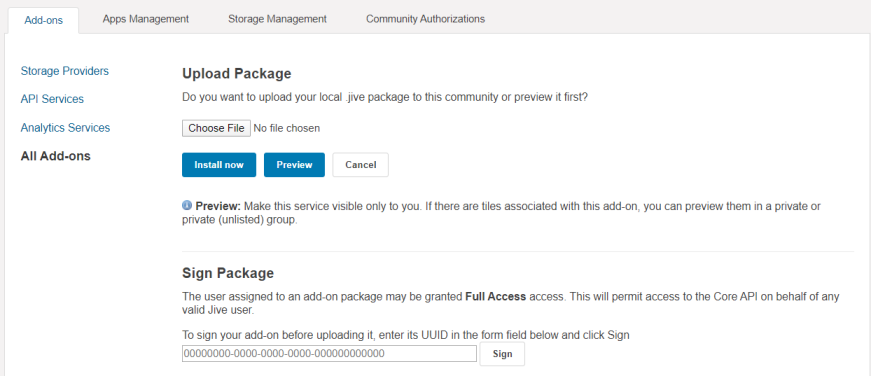
On the Add-ons tab, select All Add-ons on the right, and then click Ctrl+Upload Package (Windows) or CMD+Upload Package (MAC) to upload the package that can be signed.
-
Paste the add-on UUID into the sign package field.
-
Click Sign.
This will return a signature.
-
Open the unzipped add-on folder. Open the
definition.jsonfile and paste the signature string at the following line:"jiveServiceSignature": "<<< replace me >>>" -
Save the
definition.jsonfile. -
Compress all the files contained in this folder and name the archive.
-
Go back to the Jive Add-ons page.
-
On the Add-ons tab, select All Add-ons on the right, and click Upload Package.
-
On the Upload Package page, choose the newly compressed package file and click Install Now.
-
Select whether the add-on should be visible to all users:
- Clicking Install now makes it immediately available for all community users.
- Clicking Preview makes it available only to you. After verifying the setup, you will need to make the add-on available to other community users.
-
To verify that the add-on is installed, go to the Add-ons tab, select All Add-ons > Installed, and find the add-on in the list.
The Social Group Sync Add-on is now installed. You need to configure the add-on, as described in Configuring Social Group Sync Add-on.