Admin Essentials Add-on
The Admin Essentials add-on helps to change social group URLs and bulk-add users to social groups (by username, ID, or email address). This add-on allows group administrators to add users to the group while skipping the general invitation/accept/approval process for group membership.
Features of Admin Essentials Add-on
With the Admin Essentials add-on, users gain access to the following features:
- Add members (in bulk) – Available to all social group administrators and owners.
- Add members (single) – Available only to users from specifically configured user groups.
- Rename social group URL – Available only to users from specifically configured user groups.

Installing Admin Essentials Add-on
To install the Admin Essentials add-on, follow these steps:
Open a Support Ticket
Open a support ticket with the Support to install the add-on. A user must have at least Manage System permissions to install add-ons.
Installing from the Add-ons Page
To install the Admin Essentials Add-on from the Add-on Registry:
- In the user interface, click on your avatar in the upper-right corner, and then select Add-ons to open the Add-ons page.
- On the Add-ons tab, select All Add-ons on the right, and then click Available at the center of the page to see all available add-ons.
- Find Admin Essentials Add-on in the list and click Install next to it.
- In the Confirm Install box, select if the add-on should be visible to all users:
- To verify that the add-on is installed, go to the Add-ons tab, then select All Add-ons > Installed, and find the add-on in the list.
Installing from a Package
To install the Admin Essentials Add-on from a zipped package:
- Download the latest version of the add-on.
- In the user interface, click on your avatar in the upper-right corner, and then select Add-ons.
- On the Add-ons tab, select All Add-ons on the right, and then click Upload Package.
- On the Upload Package page, choose the package file you have been provided.
- Select if the add-on should be visible to all users:
- To verify that the add-on is installed, go to the Add-ons tab, then select All Add-ons > Installed, and find the add-on in the list.
The Admin Essentials Add-on is installed.
Using the Admin Essentials Add-on
To access the Admin Essentials actions:
- Go to the landing page of the concerned social group, where the add-on is to be configured. Select Manage > Settings.
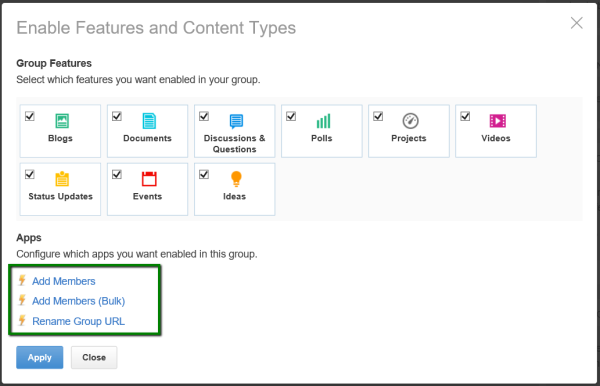
- Click the gear icon to change the advanced social group settings. This opens the Enabled Features and Content Types settings with the add-on actions.
Actions Available
- Adding members one-by-one with Admin Essentials: Administrators can add several members one-by-one while skipping the general invitation/accept/approval process for group membership.
- Bulk-adding members with Admin Essentials: Administrators can add several members in bulk while skipping the general invitation/accept/approval process for group membership.
- Changing social group URL with the Admin Essentials add-on: Administrators can change the name and URL of the social group.
Changing Social Group URL with the Admin Essentials Add-on
To access the Rename Group URL feature:
- Go to the landing page of the concerned social group, where the add-on is to be configured. Select Manage > Settings.
- Click Enable Features and Activity > gear icon to change the advanced social group settings.
- Note: Social Group Administrators who are NOT members of the predefined user groups will not be able to access the Rename Group URL feature of the Admin Essentials add-on.
- Click Rename Group URL.
- Select Unlock Rename Form.
- Provide the new group URL as indicated.
- Click Rename Group to save the settings.