Configuring Email Signature Add-on
Use the Email Signature Add-on to create signature templates for users to base their signatures upon.
User interface: Your avatar > Add-ons
A user must have at least Manage System permissions to configure add-ons.
Opening Email Signature Add-on for Editing Templates
Creating and editing signature templates is done on the Email Signature add-on configuration page. To open this page:
-
Go to User interface: Your avatar > Add-ons > All Add-ons > Installed.
-
Find Email Signature in the list, click the gear icon > Settings.

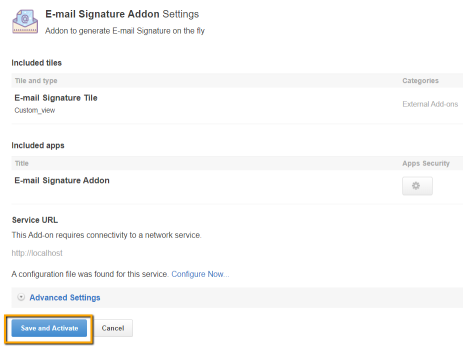
The Email Signature Add-on configuration screen is displayed.
-
Select Configure now to create or edit multiple email signature templates.

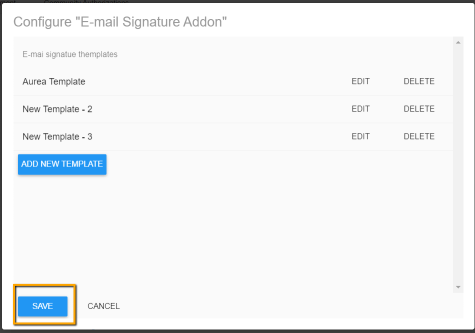
This opens the Configure "Email Signature Add-on" page with the following options available:
- Add New Template (or Edit next to
New Template -2if it is not already used) to create a new template - Edit to modify an existing template
- Delete to remove an existing template
- Save to finalize all changes to the settings.

Creating Signature Templates
To create and edit email signature templates with the Email Signature add-on:
-
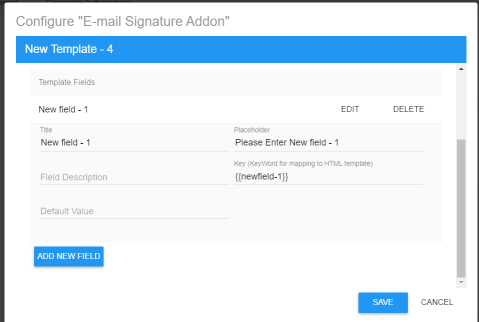
On the Email Signature Add-on configuration page, click Add New Template (or Edit next to an existing template, in case it is not already used).
A New Template - <n> screen appears for creating a new signature template.

-
Change the Title of the template.
-
Add HTML code for the new signature under Template HTML.
-
Click Add New Fields under Template Fields to add fields on the Signature Form by providing the details of the fields.
You can add fields such as First Name, Last Name, Title, Department, Location, and other Contact details.
-
For a new field, specify:
Title | The name of the field to be displayed on the form.`` |
Placeholder | The text to be displayed within the field. |
Field Description | The text to appear below the field as help text on the information expected. |
Key (Keyword for mapping to HTML template) | The text that will match the keyword defined in the HTML template for this field. |
Default Value | The text that will appear in the Preview. |
-
Add as many fields as required to capture the user signature information, by following Steps 4-5.
-
Click Save to save the field-related data provided.
-
Click Save in the Configure "Email Signature Add-on" screen.
-
Click Save and Activate in the Email Signature Add-on settings screen.